马上注册,结交更多好友,享用更多功能,让你轻松玩转社区。
您需要 登录
才可以下载或查看,没有帐号?立即注册

x
【无人深空 & Blender】最新插件(截至 6.1.5)及 NMS 导入 / 导出工作流分享
大家好,我是SONSII_Z。本期把之前在视频里讲的内容整理成文字版,方便大家查阅。本文主要包括:插件与 Blender 版本建议、插件安装以及从 Blender 到游戏的完整导入 / 导出工作流示例。 注:本文基于 nms-base-builder 6.1.5 版本。插件、工具网盘下载链接放在了B站视频简介也可以直接本站搜素,方便大家获取最新资源。
一、版本建议与说明插件版本:nms-base-builder v6.1.5(自 v6.1.5 起不再需要额外安装 Python 与 external 插件,可直接运行,兼容性更好)。 Blender 建议:推荐使用 Blender 4.0 以上;经测试 Blender 5.0 可用,但建议尽量避免最新未验证版本以减少兼容问题。 我在网盘也整理了自己当前使用的 Blender 4.2 便携版,解压即可使用(方便不想折腾环境的朋友)。
二、插件安装

3.安装后在插件列表中搜索 “No Man…” 或 nms-base-builder,确认已打勾启用。

4.启用后,进入 Create(建形)模块,点击 Launch Asset Browser 来加载资产浏览器窗口(首次加载会做初始化,请等待)。

小贴士:可通过 Blender 的窗口-系统控制台查看插件初始化与运行状态,确认无报错后再继续。
三、工作流所需工具(两种任选其一)存档编辑器(Save editor) 或 OOGC 的建模导入导出工具(导出入工具)
两者任选其一均可,我在示例中以 OOGC 的导出入工具 为例来说明。全程不需要文件导入导出,仅通过复制和粘贴PPB数据即可。 注意:强烈建议尝试前先备份好存档,以防出现不可逆的问题。
四、完整导入 / 导出工作流

2.打开导出入工具,找到对应飞船,点击 复制 PPB 数据,将飞船数据复制到剪贴板。

3.打开 Blender,按 N 键或点击侧边小箭头呼出插件面板,选择 Import NMS 导入护卫舰(插件会把飞船数据拉进 Blender)。

在 Blender 中进行建模 / 调整(使用资产浏览器导入游戏模块进行搭建)。需要的基础操作可参考 M1KO 的 NMS+Blender 教程(https://www.bilibili.com/video/B ... story.content.click)。
4.完成建模后,在插件中点击 Export NMS,将数据复制到剪贴板。

5.回到导出入工具,选中原来的飞船,使用 粘贴 PPB 数据 将修改后的数据导入回游戏。

6.进入游戏并选择重新加载恢复点(Reload Save),即可看到 Blender 中的修改结果。

五、实时调试流程在最后blender建好模型后的测试环节,如果内存够也可以Blender、导出入工具与游戏可以同时打开作实时联动。 若在游戏中发现问题:切回 Blender 修改 → Export NMS → 在导出入工具粘贴 PPB 数据 → 游戏中重新加载恢复点查看效果。 多次小幅修改与重载比一次大改更稳定,也更便于定位问题。
六、分享与备份
七、注意事项与常见问题
No Man’s Sky & Blender】nms-base-builder (v6.1.5) — NMS Import / Export Workflow
Hi everyone — I’m SONSII_Z.
This post is a written companion to my video: it collects the steps and notes so you can reference them easily. It covers plugin & Blender version recommendations, plugin installation, and a complete example workflow for moving ships between Blender and No Man’s Sky (NMS). Note: this guide is based on nms-base-builder v6.1.5. Download links for the plugin and tools are in the Bilibili video description; you can also find them on OOGC for convenience.
1. Version recommendations & notesPlugin: nms-base-builder v6.1.5 — starting from v6.1.5 the plugin no longer requires a separate Python / external plugin install and runs more reliably across systems. Blender: recommended Blender 4.0+. Blender 5.0 can work in tests, but avoid very new, unverified releases to reduce compatibility issues. I’ve uploaded a portable Blender 4.2 build to my drive — just unzip and run if you don’t want to configure an environment.
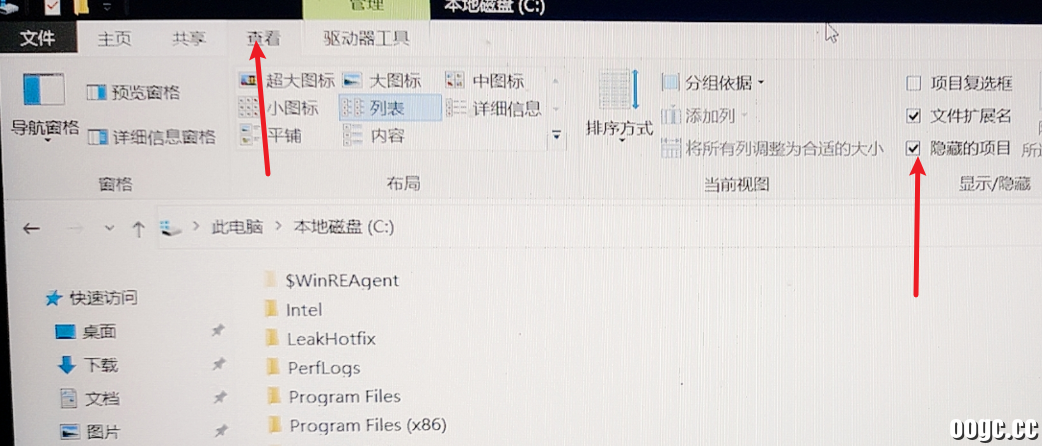
2. Plugin installationDownload the nms-base-builder ZIP from GitHub or the shared drive (no need to unzip). In Blender: Edit → Preferences → Add-ons → click the small arrow or “Install…” button at the top right → select the downloaded ZIP and install. After installation, search the add-ons list for “No Man …” or nms-base-builder and make sure it’s checked / enabled. In Blender’s Create area, click Launch Asset Browser to open the asset browser window. The first load will initialize the asset database — please wait.
Tip: open Window → Toggle System Console (or the system console) to view plugin initialization messages and check for errors before proceeding.
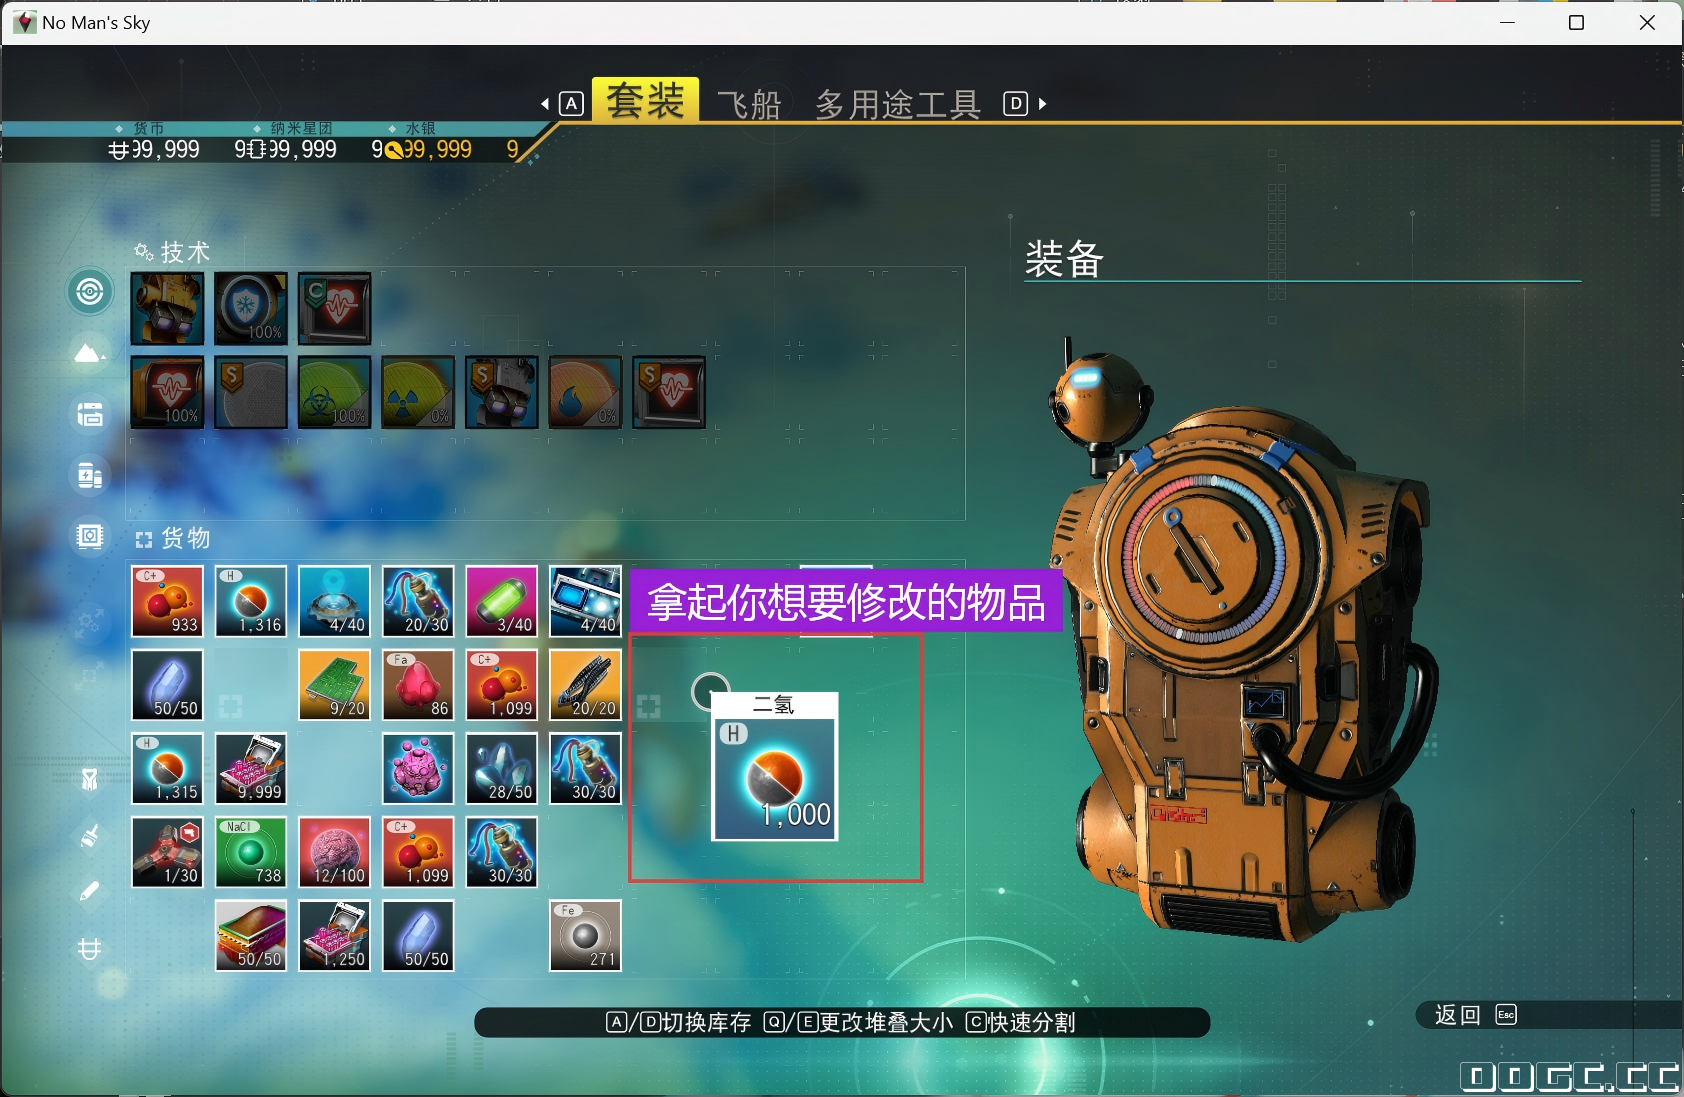
3. Required tools (choose one)You only need one of the following tools: Both work. In my example below I use the OOGC’s NMSModelIOTool. The workflow does not require manual file import/export — it uses the plugin tool’s Copy / Paste PPB data process. Important: Always back up your game save before trying anything — this is strongly recommended.
4. Full import / export workflowIn game, prepare the frigate/ship you want to modify. Rename it to make it easy to find. Open the NMSModelIOTool, locate the ship(无人深空建模导出入工具-自定义飞船- ship), and click Copy PPB Data(复制 PPB 数据) to copy the ship’s data to the clipboard. In Blender, press N (or open the side panel) to show the plugin UI, then click Import NMS to import the ship data — the plugin will pull the ship into Blender. When your model is ready, click Export NMS in the plugin to copy the modified PPB data to the clipboard. Return to the import/export tool, select the original ship, and use Paste PPB Data(粘贴 PPB 数据)to write the modified data back into the save. In game, Reload Save (reload the restore point) to see your changes reflected.
5. Live testing / iterative workflowIf your system has enough memory, you can keep Blender, the NMSModelIOTool, and the game open at the same time for rapid iteration. Typical loop: Small incremental changes + repeated reloads are more stable and easier to debug than making large edits at once.
6. Sharing & backupsAfter you finish, you can export a .json from the NMSModelIOTool for backup or sharing. Feel free to upload finished ships to the OOGC resource center and share with the community. There are many examples and shared models that can be useful references.
7. Notes & common issuesBackup: always back up your save before the first attempt. Compatibility: use recommended Blender versions (portable 4.2 is a safe option) to minimize problems. Performance: very large builds / many modules may cause lag or crashes. Test at low graphics settings first and evaluate your hardware limits. Multiplayer caution: models are built from in-game assets and are visible to other players; if a frigate exceeds construction limits, avoid bringing it into shared anomalies or multiplayer sessions (turn multiplayer off when testing) to prevent disrupting others.
|